From Code to Pixels: How Rendering Works
Part 1. Browser Engines.
Introduction
Interface development isn't just about JavaScript logic. In the end, it all comes down to what the user actually sees on screen and how. It might be a complex form with lots of states and validations, or it might be falling snowflakes in a New Year's interface.
HTML, CSS, markup: not all interface developers enjoy diving deep into these topics. But as usual, I want to get into the very guts of what's happening. So in this research we'll figure out exactly how rendering works — what happens between the moment the browser receives a page's URL and loads the HTML, and the moment we see the finished page. And we'll start with browser architecture and what parts it consists of.
Chromium's Multi-Process Architecture
In previous research we talked a lot about V8 — the engine that executes JavaScript and is used not only in Node.js but in many browsers. But a browser is a far more complex system, and V8 is just one of its components.
In today's research I'll be using Chromium as my reference — the open-source project that powers Chrome, Edge, Opera, and other browsers.
One of Chromium's key features is its multi-process architecture. Instead of one process, the browser is split into several independent processes, each responsible for its own task. This is done primarily for security and stability: if something breaks in one process, the entire browser won't crash.
A process is an isolated instance of a program. A process has its own memory address space, its own resources (heap, stack, file descriptors) and access restrictions. Processes cannot directly read or write each other's memory — special mechanisms (IPC) are needed for this.
The main process is called the browser process. It's responsible for the browser's user interface, managing tabs and windows, and coordinating the other processes.
Separately, there are child renderer processes — processes that handle the display of web content. This is where HTML is parsed, JavaScript is executed, and ultimately the page is rendered. Each such process uses the Blink engine to interpret and display content.
Inside the rendering process there are special RenderFrame objects, which correspond to frames with documents — the page's main document and iframes.
Usually, a new tab or window starts in a new rendering process. The browser process creates the process and tells it to create one RenderFrame. Inside the page, iframes may appear — sometimes in the same process, sometimes in others.
And here an important question arises: how many rendering processes are actually created?
From a security perspective, the ideal is a separate process per site. This is called site isolation. A site here means a URL's protocol + registrable domain + one level of subdomain. For example, mail.example.com and chat.example.com are considered one site, while example.com and example2.com are different.
But in reality things aren't so simple. If the user has many tabs open or the device is weak, it may be too expensive for the browser to maintain one process per site. In such cases, one rendering process may serve multiple tabs or iframes from different sites. So there's no strict one-to-one relationship between tabs, iframes, and processes.
Sometimes the browser intentionally reuses a process. For example, if a page opens a new window of the same origin via window.open, the browser may keep it in the same process.
Since the renderer runs separately from the browser process, Chromium can strictly limit its permissions using a sandbox. The renderer cannot directly access the network, work with the file system, or access input devices — all of this goes through the browser's special services. This greatly reduces potential damage if the rendering process is compromised.
In addition to browser and renderer processes, Chromium also isolates other subsystems into their own processes — for example, the GPU, the network stack, or data storage. All network communication is controlled by the browser process to centrally manage cookies, cache, and connection count.
The Blink Rendering Engine
Blink is the rendering engine used in Chromium. It's responsible for everything related to displaying content in a browser tab.
Its responsibilities include:
- implementing web standards (HTML, CSS, DOM);
- embedding V8 and running JavaScript;
- loading resources through the network stack;
- building the DOM tree;
- computing styles and layout;
- interacting with the Chrome Compositor and rendering graphics.
The rendering process is not a single thread. Blink has a main thread, several worker threads, and several internal service threads. Almost everything important happens on the main thread: executing JavaScript, working with the DOM, computing styles and layout.
A thread is a unit of execution inside a process. Multiple threads share the memory and resources of one process but execute in parallel. Creating threads is cheaper than creating processes, but errors in one thread can affect the entire process.
Blink is historically optimized for this predominantly single-threaded model. Worker threads are used for Web Workers, Service Workers, and Worklets. Additional internal threads may handle audio, databases, garbage collection, and other tasks. Communication between threads happens through message passing.
Now a bit about Blink's internal entities.
- Page roughly corresponds to a browser tab.
- Frame is a page frame: the main document or an iframe.
- DOMWindow is the
windowobject in JavaScript. - Document is
window.document.
The relationships between them look like this:
- one rendering process can contain multiple Pages;
- one Page can contain multiple Frames;
- each Frame at any given moment has exactly one DOMWindow and one Document.
During navigation, a Frame can be reused, but DOMWindow and Document are recreated. For example, after executing iframe.contentWindow.location.href = "https://example.com" for an existing iframe on the page, a new Document and a new window are created, but the Frame object itself may remain the same.
Site isolation adds another level of complexity. If a page contains a cross-site iframe, different parts of the page may be served by different rendering processes.
For example, code on https://example.com:
<body>
  <iframe src="https://example2.com"></iframe>
</body>
In this case the main frame and the iframe may be in different processes, and data exchange between them happens through the browser process.
Interaction with V8
In our research on V8 we already covered the interaction between Blink and V8, but it's important to recap it here too.
To understand this mechanism, it's important to grasp three concepts: isolate, context, and world. They describe different levels of JavaScript code isolation and answer different questions.
An Isolate is an isolated JavaScript execution environment inside V8.
The easiest way to think of it is as a separate JS machine with its own memory and garbage collector. In Chromium, an isolate is tightly bound to a thread: the main thread has its own isolate, and each worker has its own. This means that JavaScript from different threads never shares memory directly.
A Context is a specific JavaScript execution context, tied to a global object.
For a regular page, this is the window object. Each Frame has its own window, and therefore its own context. During navigation the context is recreated: a new window appears, new global variables, and a new JavaScript environment — even if the Frame itself remains the same.
A World is a logical "sandbox" for JavaScript code.
This concept doesn't exist in web standards and is used by the browser to isolate different sources of JavaScript. The clearest example is browser extensions. The page's scripts and extension scripts need to work with the same DOM, but without access to each other's JavaScript objects. To achieve this, the browser creates multiple worlds: the page's main world and separate isolated worlds for each extension. Importantly, the DOM tree is shared — it's implemented on the C++ side in Blink. But the JavaScript objects through which this DOM is accessed are different for each world.
Putting it all together, the picture looks like this:
- one thread has one isolate;
- inside it there can be multiple frames;
- each frame can have multiple worlds;
- and for each "frame + world" pair, a separate JavaScript context is created (i.e., its own
window).
Thread
 └── Isolate
      └── Frame #1
      │    ├── World #1 (page)
      │    │     └── Context (window)
      │    ├── World #2 (extension A)
      │    │     └── Context (window)
      │    └── World #3 (extension B)
      │          └── Context (window)
      └── Frame #2
           ├── World #4 (page)
           │     └── Context (window)
           └── World #5 (extension C)
                 └── Context (window)
In workers everything is simpler: there's always one thread, one isolate, one world, and one context.
This multi-level model is needed by the browser to simultaneously ensure security, isolation, and the ability for different parts of the system to work with the same DOM without breaking each other's environment.
From the moment HTML enters Blink to the appearance of pixels on screen, a long path is traveled. This path consists of several stages — and these are exactly what we'll break down in the next part.
Part 2. The Rendering Pipeline.
In the first part we covered how the Chromium browser works at the process and thread level. Now it's time to trace the full path from HTML, CSS, and JavaScript to actual pixels on screen. This path is called the rendering pipeline.
The Beginning and End of the Pipeline
Content is a general term in Chromium for all code inside a web page or the interface of a web application. It doesn't include the browser's own UI, such as the address bar or navigation elements. The main building blocks of content are:
- text,
- images,
- HTML — the markup surrounding the text,
- CSS — styles that define how the markup is displayed,
- JavaScript — scripts that can dynamically change all of the above.
A real web page is a set of HTML, CSS, and JavaScript files transmitted over the network as plain text. There are no compilation or packaging stages like on other software platforms: the page's source code is the direct input for the rendering system.
At the other end of the pipeline, the browser needs to output pixels to the screen using the operating system's graphics libraries. Inside Chromium, the Skia library plays the key role — it's responsible for rendering primitives, text, images, and effects. Skia can be thought of as a universal graphics engine that abstracts working with specific hardware. At the raster stage, the browser forms drawing commands in Skia terms, then translates them into calls to low-level graphics APIs available on the specific platform.
Depending on the system and configuration, Chromium can use different backends. To see which graphics stack the browser is working with, you can open the service page chrome://gpu. It displays a table with technical information, for example, mine looks like this:
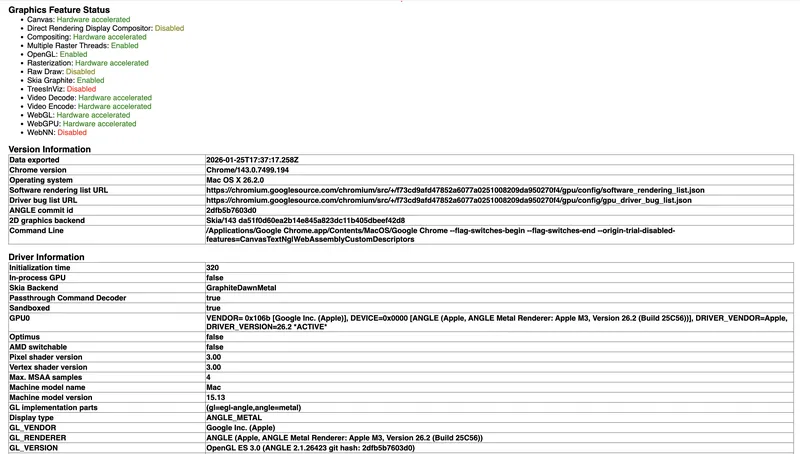
Here we can see that the main 2D backend is Skia (the 2D graphics backend field), and the graphics engine used is a combination of Graphite, Dawn, and Metal (the Skia Backend field). This means all drawing operations first pass through Skia, then are processed by the new Graphite render core, translated through the Dawn WebGPU infrastructure layer, and finally executed using Apple's native Metal API. In parallel, the browser uses the ANGLE library, which translates OpenGL ES calls to Metal, allowing Chromium to maintain a unified graphics interface across different platforms (the Display type field). The table also shows that the GPU runs in a separate isolated process, which improves stability and security (the In-process GPU and Sandboxed fields), and the actual renderer is a Metal implementation for Apple M3 (the GL_RENDERER field).
Thus, Chromium isn't tied to a single graphics API. Skia acts as an intermediate layer, and the choice of a specific backend happens dynamically based on the platform, drivers, and device capabilities. This allows the browser to maintain a unified rendering pipeline while still making efficient use of graphics acceleration in a wide variety of environments.
Main Pipeline Stages
The goal of rendering can be stated as follows: transform HTML, CSS, and JavaScript into correct graphics platform calls to display pixels. However, when describing the pipeline, a second goal must also be considered: the browser needs intermediate data structures for efficiently updating the UI and handling requests from JavaScript and other subsystems.
That's why inside Chromium the rendering pipeline is implemented as a sequence of stages, each of which builds its own data structures and prepares information for the next step. It's important to understand that the browser doesn't "redraw the entire page" on every change. It tries to reuse already-computed data and update only what has actually changed. The modern architecture of this process is described within the RenderingNG approach.
In RenderingNG, each frame is formed in several stages, which are roughly divided into three groups: data preparation on the main thread, work on the compositor thread, and final output through the GPU (viz process). Inside these groups are specific stages executed in a strictly defined order. Not every frame needs to go through all stages completely: if changes only affect visual effects or scrolling, the browser can skip geometry recalculation and content re-rendering.
Everything starts with HTML parsing. The browser analyzes the document text, restores tag nesting, and builds the DOM — a tree structure reflecting the logical organization of the page.
Then in the animate stage, animations, transitions, and other time-dependent effects are updated. Here, special data structures are formed describing transparency, transformations, clipping, and other visual properties of elements. These data allow changing the appearance of elements without fully recalculating the page.
After that, style processing is performed. The browser calculates the final CSS property values for each element, taking cascade, inheritance, and specificity into account.
The next stage is layout — computing the page's geometry. Here, the size and position of all elements are determined, and a fragment tree is formed describing the future layout. This is one of the most resource-intensive stages, as changing one element can affect many others.
In the pre-paint stage, the browser updates visual structures and determines which parts of the image can no longer be reused. This allows precisely calculating the areas that need repainting.
The scroll stage follows, responsible for updating scrolling. Instead of recalculating the entire page, the browser changes the viewport offset using already-existing data structures.
In the paint stage, a display list is formed — a list of commands describing what should be drawn and in what order. This list is not tied to a specific graphics API and serves as an intermediate representation between page logic and actual rendering.
After that, data is transferred from the main thread to the compositor — the commit stage. This separates data preparation from visual display, allowing the main thread to continue executing JavaScript.
In the layerize stage, the scene is broken into compositor layers. These layers can move and animate independently, but their number is limited by performance considerations.
Rasterization follows, during which commands from the display list are converted into texture tiles used by the GPU.
In the activate stage, a compositor frame is formed — a description of the future frame's structure.
In the aggregate stage in the viz process, frames from different sources are merged: tabs, the browser interface, and embedded frames.
The final stage is draw — the actual GPU rendering of the frame and output of the image to screen.
In summary, the rendering pipeline in Chromium (RenderingNG) looks like this:
1. **Parsing**
   → parsing HTML and CSS
   → building DOM and style sheets
2. **Animate**
   → updating animations and time-dependent effects
3. **Style**
   → applying CSS and computing final styles
4. **Layout**
   → calculating element sizes and positions
5. **Pre-paint**
   → preparing for rendering, updating visual states
6. **Scroll**
   → handling scrolling and content offset
7. **Paint**
   → forming rendering commands
8. **Commit**
   → transferring data from main thread to compositor
9. **Layerize**
   → breaking the scene into layers
10. **Raster / Decode / Paint Worklets**
    → rasterization, image decoding, texture generation
11. **Activate**
    → assembling the frame for display
12. **Aggregate**
    → merging frames from different sources
13. **Draw**
    → rendering via GPU
CPU and GPU Tasks in Chromium
In the modern Chromium rendering pipeline there's a clear boundary between CPU and GPU tasks. All stages related to analyzing page structure — parsing, DOM building, style computation, layout, and forming paint instructions — are performed on the CPU side. These tasks require complex logic and specification interpretation, which is currently more efficiently done on the processor.
At the same time, rasterization and final output are performed on the GPU. The graphics processor is responsible for converting drawing commands into pixels, applying shaders, decoding images, and working with native graphics APIs like Metal, Vulkan, or DirectX. This division allows the CPU to focus on page logic while the GPU handles parallel graphics processing. Moving some compositing operations to separate threads further reduces load on the main thread and improves interface responsiveness.
Part 3. Main Thread Stages.
Parsing
When an HTML document starts loading, Blink launches a streaming parser of the incoming byte stream. The parser works incrementally: it processes the document as data arrives from the network, allowing rendering to begin before the page is fully loaded.
The input stream is tokenized according to the HTML5 specification. Based on these tokens, Chromium builds the DOM tree, applying document construction rules including handling of malformed HTML.
In parallel, the browser parses CSS and builds CSSOM — the CSS Object Model. This is a rule tree optimized for efficient style-to-DOM-element matching.
An important feature of Chromium's parser is the speculative preload scanner, which runs in parallel with the main parser. It scans HTML "ahead," finds links to external resources (scripts, styles, images), and initiates their loading in advance, noticeably speeding up the overall page load time.
Animate
After parsing and DOM construction, when it's time to update the display, Chromium launches the frame formation pipeline. The first significant stage in it is the animate phase.
Computations at this stage can be performed either on the main thread or the compositor thread, which we'll discuss in more detail later.
In animate, functions registered via requestAnimationFrame are called, since their results must be ready before layout begins. These are typically DOM or style changes.
Also in this phase, Chromium computes the current state of all active CSS animations (@keyframes) and transition. To do this, it takes the current timestamp, accounts for duration, delay, easing functions, and timeline, then interpolates property values between keyframes. The result is specific computed style values for the current frame.
After these computations are complete, elements are marked with dirty flags. In the very next phase — style — the browser recalculates styles only for modified nodes.
The animate phase is placed before style and layout for a reason: it allows collecting all changes from animations in advance and processing them in one pass, avoiding redundant recalculations.
Style
The style phase is responsible for recalculating styles and always runs on the main thread. Its job is to gather all changes accumulated in previous stages (parsing, script execution, animations) and turn them into final computed element styles.
Chromium doesn't recalculate styles for the entire tree at once. It uses a dirty flag system: when something changes — a class, an inline style, DOM structure, or an animation result — the element and its ancestors are marked as "dirty." Recalculation is only performed for those branches.
Then for each such element, matching CSS rules are gathered from the CSSOM accounting for cascade, specificity, and inheritance. A final computed style is then formed.
Importantly, selectors are indexed by the last simple selector — tag, class, or id. Therefore matching goes right-to-left, which in practice turns out to be most efficient.
At the end of this phase, all "dirty" elements have up-to-date computed styles, and the pipeline moves to layout.
Layout
In the layout stage, the browser turns the DOM and computed styles into specific element sizes and positions on screen.
Different layout algorithms are used: regular flow layout, flexbox, and grid. Each works on the principle of parent-child interaction: the parent passes constraints to the child element (e.g., available width), which then uses them along with its own styles to compute its dimensions.
Block layout usually fits in one pass, while flex and grid require multiple stages. First, natural element sizes are computed, then a placement pass is performed. Previously, with deep nesting of such containers, complexity could grow exponentially. In Chromium's modern architecture, this problem is solved through explicit caching of intermediate results.
The result of the layout phase is an immutable fragment tree, where each fragment stores an element's size and position. Once created, fragments are not modified, and there are no upward references or parent-to-child data passing in the tree. Thanks to this, on the next update most of the tree can be reused, recalculating only the changed branches.
Text and inline content is stored separately — as a flat list. This speeds up traversal and reduces memory usage, which is especially important for text rendering.
Pre-paint
The pre-paint phase follows immediately after layout. At this stage, the fragment tree is traversed with two main goals.
The first is paint invalidation. In previous phases, elements are marked as changed, and pre-paint determines which areas of the screen need repainting.
The second goal is building property trees.
Property trees are four separate trees: transform, clip, effect, and scroll. They only include elements that actually create the corresponding effects. The structure of these trees reflects not the DOM itself, but the "container → descendant" relationships between visually significant nodes.
- Transform tree stores everything related to an element's position and movement: offset, CSS transforms, perspective, and scroll translation.
- Clip tree describes all types of clipping: clip-path, overflow clip, border-radius clipping.
- Effect tree stores visual effects: opacity, filters, masks.
- Scroll tree handles scroll chains.
Cross-references exist between trees, indicating the relative order of applying effects of different types. Each DOM element has its own property tree state — a set of four references to corresponding nodes. This is exactly what allows precisely determining the element's position and how it should be rendered.
Scroll
The scroll phase is one of the few that can run entirely on the compositor thread, bypassing the main thread. Its main goal: ensure smooth scrolling even when the main thread is busy with heavy JavaScript or other tasks.
Updating a scroll offset comes down to changing one node in the transform tree, and all descendants automatically shift with it. That's why scrolling is cheap — no layout, pre-paint, or paint is involved.
In some cases scroll cannot be handled by the compositor — for example, when synchronous touch event handlers are present. Then the event is passed to the main thread. Such situations are called slow scrolls, as opposed to fast scrolls on the compositor thread.
Paint
The paint phase follows immediately after scroll. Its job is to turn the fragment tree and property trees into a flat list of drawing commands that can later be rasterized into GPU textures.
This list is called a display list, and its atomic unit is a display item. Each display item represents one specific operation: rendering a background, text, borders, and other visual elements.
Each display item is created by a specific object from the fragment tree. Additionally, when created, it is assigned the current property tree state — the same quartet (transform, clip, effect, scroll) we examined earlier. This determines in which coordinate space and with which set of effects the element should be rasterized.
After the display list is formed, it's divided into paint chunks — groups of adjacent display items with the same property tree state. Chunk boundaries occur where the state changes. For example, if one subtree scrolls but the adjacent one doesn't, they'll end up in different chunks.
Each paint chunk is a potential candidate for a separate composited layer in the next phase — layerize. Chunks serve as the primary unit of granularity for raster invalidation: when changes occur, the system compares new chunks with old ones and determines which areas need re-rasterization.
Commit
Commit is the synchronization phase between the main thread and the compositor thread.
Up until this point, all the work — style, layout, pre-paint, and paint — is performed on the main thread and operates on data structures like the fragment tree, property trees, and display list. The compositor thread, in turn, works with its own copy of these data. Commit is the only point where these two worlds synchronize: data from the main thread is atomically copied to the compositor. To do this, the main thread is blocked — it stops and waits for the copy to complete. The commit itself is a relatively cheap operation and usually takes a few milliseconds. However, it cannot be interrupted mid-way, otherwise the compositor thread would receive an inconsistent state.
All copied data doesn't immediately go into the "live" layer tree but into what's called the pending tree — an intermediate structure. The pending tree exists to ensure atomicity of visual changes. If multiple mutations occurred in one frame — an element shift, a background change, a canvas draw — the user must see them simultaneously, not one after another.
After commit completes, the main thread unblocks and can begin preparing the next frame.
A Bit More About Animate
The animate phase is formally positioned at the beginning of the rendering pipeline — before style — but by its nature it differs from other phases. It can run either on the main thread or entirely on the compositor thread, and this distinction is key for performance.
In Chromium there are two types of animations.
The first type is main thread animations. They mutate properties that affect layout, such as width, height, or left. These animations work through the standard cycle: on each frame the engine computes the current value, marks the element as "dirty," and then the full pipeline runs: style → layout → pre-paint → paint.
The second type is animations that can fully bypass the main thread. Candidates for acceleration are animations affecting the transform, opacity, filter, and backdrop-filter properties. These properties are represented in property trees as transform and effect nodes and can be mutated on the compositor thread without recalculating layout.
Part 4. Compositor Thread Stages and GPU Work.
Layerize
As we saw earlier, the compositor thread works with its own copy of data from the property trees (four trees: transform, clip, effect, and scroll) and the display list — the list of drawing commands. The display list is already divided into paint chunks — groups of adjacent commands with the same property tree state. Chunk boundaries occur where the state changes. For example, if one subtree scrolls but the adjacent one doesn't, they'll end up in different chunks.
The layerize phase turns the flat list of paint chunks into a hierarchy of composited layers. These layers will be rasterized independently and then assembled by the GPU into the final image. As input, layerize receives an ordered list of paint chunks with their property tree states; as output, it forms a set of layer objects. Each such layer contains a portion of display items and a corresponding fragment of property trees.
At this stage the browser solves an important trade-off problem. On one hand, all paint chunks could be merged into one enormous layer and rasterized all at once, but then any change would require completely redrawing the entire scene. On the other hand, a separate layer could be created for each chunk, but this would quickly lead to excessive GPU memory consumption. Layerize balances between these extremes and creates layers only where it genuinely improves performance.
The layerize algorithm works in two steps. First, a PendingLayer object is created for each paint chunk — a candidate for a separate layer. Then the algorithm attempts to merge adjacent PendingLayers into one layer, where possible. Merging may be prohibited, for example, in the following cases:
- the chunk has explicit reasons to be in a separate layer: the element is animated on the compositor thread or uses
will-change; - merging would result in a large amount of empty space: the chunks are far apart and there'd be an "empty" layer between them wasting memory.
Once the final list of PendingLayers is formed, a real composited layer is created for each one. This layer already lives in the compositor thread's space and contains a recorded sequence of drawing commands that will later be rasterized into textures.
Raster, Decode & Paint Worklets
Raster is the stage where display lists are turned into real pixels written into GPU textures. Each composited layer is divided into square tiles, and rasterization happens tile by tile. Tiles are sorted by priority: those in the current viewport are processed first, then those that will soon be needed during scrolling, and only then the rest. The rasterization itself is performed on the GPU in the viz process using Skia, so as not to block either the main thread or the compositor thread.
Decode is a separate task that often runs in parallel with rasterization. Images (JPEG, PNG, and others) are stored in the display list in compressed form to avoid increasing data volume when transferring from the main thread. Decoding is a fairly heavy operation, and performing it on the compositor thread would cause FPS drops. So in Chromium, decoding is offloaded to separate worker threads.
Paint worklets are part of CSS Houdini, which allows developers to write their own code for generating graphics. When the compositor rasterizes a tile with an element using a paint worklet, it calls the worklet code, gets the result, and embeds it into the texture. Importantly, a paint worklet can be called many times — when element dimensions or CSS variables change — so its code must be as lightweight as possible.
Activate
During the commit phase, data from the main thread doesn't go directly into the "live" layer tree but into the temporary pending tree. The activate phase is the moment when the pending tree becomes the active tree.
Chromium always maintains at least two layer trees on the compositor thread:
- active tree — used to generate frames right now;
- pending tree — contains updates from the main thread and is rasterized in the background.
This separation exists so that while the pending tree is being processed, the active tree can continue generating frames for scroll and animations. Activation only happens when all visible tiles of the pending tree are fully ready. Until that moment, the browser continues drawing the old version of the scene, even if it's already outdated.
The activate process is similar to commit, but works entirely inside the compositor thread — data is moved from the pending tree to the active tree. This is an atomic operation: the user either sees a fully updated frame or still the old one, with no intermediate states. After activation, the pending tree is freed and used for the next update.
The result of the activate phase is a compositor frame — a set of instructions for drawing the entire scene, divided into render passes. Each render pass contains an ordered list of quads — drawing primitives. Each quad references a GPU texture, specifies coordinates, transformations, and effects. Most often these are texture quads with rasterized tiles from previous stages, but there are also solid color quads (flat color fill) and video quads. The finished compositor frame is sent to the viz process for further processing.
Aggregate
Aggregate is the phase where compositor frames from different sources are merged into one final frame ready for display.
In modern Chrome there are several independent sources of compositor frames:
- render processes create frames for tabs and iframes;
- the browser process creates frames for the browser UI.
All of them send their compositor frames to a single viz process. Each frame receives a unique id, and other compositor frames can reference it through a SurfaceDrawQuad.
Aggregation works recursively. The algorithm starts with the root frame (usually the browser UI or the main page of a tab) and goes through all quads in drawing order. If a quad is a regular one — texture or solid color — it's simply copied into the final compositor frame. If the quad is a SurfaceDrawQuad, the aggregator finds the corresponding compositor frame and recursively embeds its contents. During this process, optimizations are also applied: for example, if an iframe is completely off-screen, its quads can simply be omitted.
The result is a single compositor frame with all quads aligned in the screen's common coordinate system.
Draw
Draw is the final phase, where the aggregated compositor frame is turned into real GPU commands.
The viz process uses several backend implementations for working with the GPU. The main modern backend is SkiaRenderer. It goes through all render passes inside the aggregated frame and generates drawing commands for each quad.
For SkiaRenderer the process consists of two stages. First, Deferred Display Lists (DDL) are formed — Skia structures in which drawing commands are recorded but not yet executed on the GPU. For each quad, the corresponding Skia command is called and added to the DDL. When all DDLs are ready, they are passed to the GPU main thread in the viz process. This thread is the only one that directly communicates with the GPU driver. Skia plays back the DDLs and converts them into real GPU instructions.
What Definitely Creates a Compositor Layer
Based on the pipeline architecture and the workings of layerize, we can identify DOM elements that will almost certainly get their own composited layer and be rasterized separately. This is important to keep in mind when optimizing: independent layers speed up animations and scroll, but an excess of them increases memory consumption and overhead.
Reasons for layer creation
- 3D transforms and perspective: Elements with
transform: translateZ(),rotateX(),rotateY(), orperspectiveget a separate layer so transforms can be applied without repainting content. - Compositor-animatable properties: Animations of
transform,opacity,filter,backdrop-filter, includingwill-change, automatically create a layer. - Video and Canvas:
<video>and<canvas>get a layer because their content updates independently of layout and can be used as a GPU texture. - Overflow scrolling: Elements with
overflow: scrollorautoand actual scrolling get a layer for handling scrolling on the compositor thread. - position: fixed and position: sticky: Such elements change position on scroll, and the compositor can update their transform without recalculating layout.
- Iframes: Each
<iframe>, especially from a different origin, gets a layer due to isolation and security. - Elements with composited descendants: If a descendant requires a layer, the parent often becomes composited too.
- CSS filters and backdrop-filter: Elements with filters are often moved to a separate layer.
What doesn't automatically create a layer
- Regular CSS properties like
color,background-color,border,width,height— they require a full cycle. - Animations of non-compositor properties (e.g.,
width,left,top) — they animate on the main thread and recalculate layout every frame. - Elements with
z-indexalone —z-indexonly affects drawing order and doesn't create a layer without other reasons. - Absolute positioning (
position: absolute) without other triggers — it doesn't change on viewport scroll, so doesn't need a layer.
Practical recommendations:
- Use
will-change: transformortransform: translateZ(0)only for elements that will actually be animated — excess layers waste memory. - Check the number of layers through DevTools → three dots → More Tools → Layers.
- There you can also see why a particular element was moved to a separate layer (Specific layer → Details → Compositing Reasons).
Part 5. Rendering in React.
In previous parts we covered how rendering works in the browser using Chromium as an example. In this part we'll discuss how component rendering works inside React, and what approaches React uses to make it fast and non-blocking.
Elements, Components, and the Virtual DOM
When a developer writes JSX, under the hood the build tool (e.g., Babel or esbuild) compiles it into React.createElement calls. The expression <Button color="blue" /> becomes React.createElement(Button, { color: "blue" }), whose result is a simple JavaScript object — a React element. This is neither a component instance nor a DOM node, just a description of what needs to be rendered: type, props, and children. These elements are recreated on every render, but based on them React works with a completely different data structure that lives much longer.
Previously this structure was called "virtual DOM," but starting from version 16 the React team abandoned this definition. The reason is that React doesn't work only with the DOM — there's React Native, for example. The structure used by all platforms is the same, but the actual rendering work on the platform is done by a specific renderer. So talking about "virtual DOM" as a universal concept isn't quite accurate — it's more correct to talk about the fiber node tree.
The Fiber Node: A Virtual Stack Frame
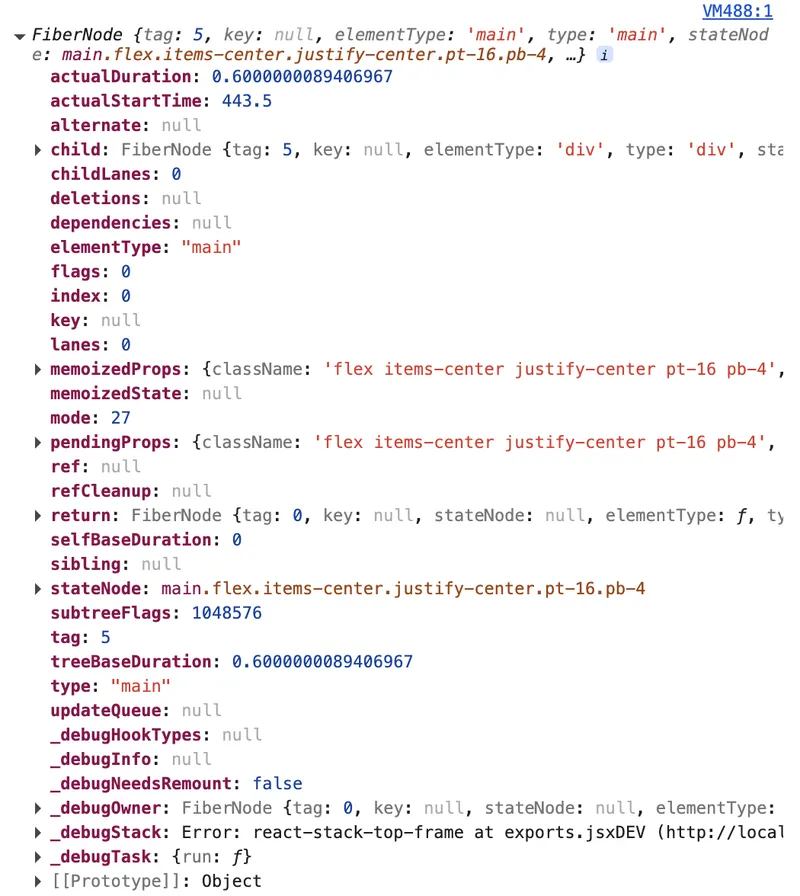
Fiber is a regular JavaScript object that is the primary unit of work in React since version 16. Each component in the tree has its own fiber node, and unlike React elements which are recreated on every render, fiber nodes mutate and live as long as the component lives. This way React doesn't recreate the entire tree from scratch but updates existing nodes.
Each fiber node stores quite a lot of information: for example, the component type (type), its props in two variants — pendingProps (those that will be used in the current render) and memoizedProps (those that were used in the last completed render). The hook state of functional components is stored in memoizedState as a linked list, where each node corresponds to one hook call. The queue of scheduled updates is in updateQueue.
You can look at the fiber object through the component's DOM element in your browser console, for example:
const el = document.getElementById('root').firstChild;
const fiberKey = Object.keys(el).find(k => k.startsWith('__reactFiber'));
const fiber = el[fiberKey];
console.log(fiber);
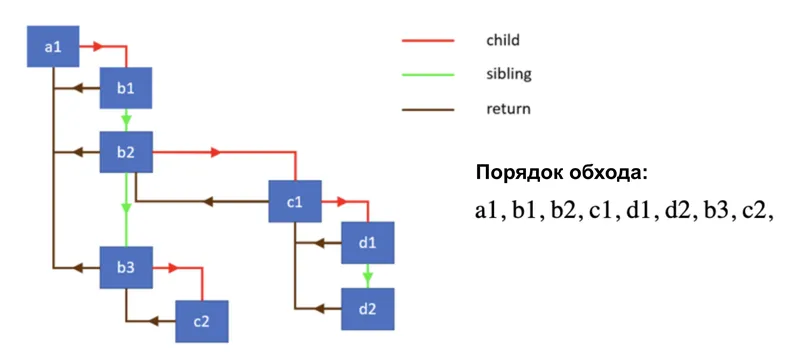
For tree navigation, fiber uses three pointers: child — to the first descendant, sibling — to the next sibling, and return — to the parent. This structure allows traversing the tree iteratively without recursion — and this was the key technical decision that distinguishes Fiber from the previous Stack Reconciler.
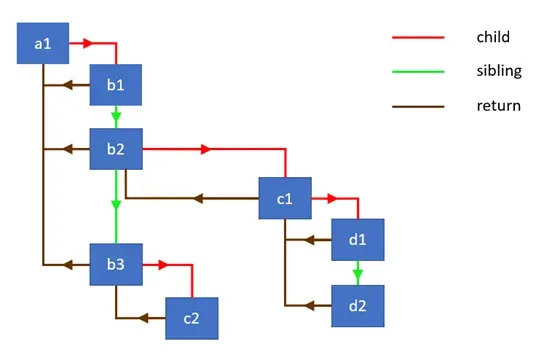
The old Stack Reconciler used simple recursion and relied on JavaScript's built-in call stack during tree traversal, which cannot be interrupted: once started, recursion must run to completion. Fiber made it possible to abandon recursion, and now React manages the traversal itself: it can defer, pause, or cancel it at any moment.
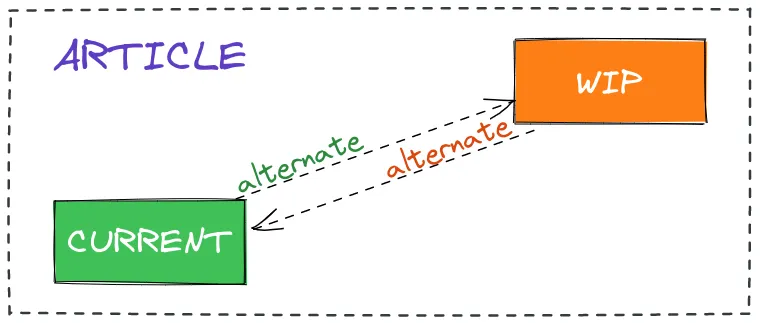
Double Buffering: current and workInProgress
React always maintains not one but two fiber node trees in memory. The first is called current — this is the tree currently displayed on screen. The second is called workInProgress — the tree being worked on right now. When an update arrives, React doesn't modify the current tree directly but builds a new workInProgress tree, cloning existing nodes through the alternate field. Each fiber node in the current tree contains an alternate pointer to its counterpart in the workInProgress tree, and vice versa. When the work is done and it's time to apply changes to the DOM, React simply swaps the pointers: the workInProgress tree becomes the new current, and the old current becomes the template for the next workInProgress. This technique is called double buffering, and it's exactly what guarantees the user will never see an intermediate, inconsistent interface state.
During updates, React tries to reuse existing fiber nodes as much as possible. If a node has no changes, React can apply an optimization — skip it and the entire subtree completely, which significantly reduces the amount of work. This is exactly the principle that React.memo, useMemo, and shouldComponentUpdate work on: they help React make this optimization decision as often as possible.
Work Loop: beginWork and completeWork
Tree traversal happens inside a while loop. The loop takes the current workInProgress node and calls performUnitOfWork on it. Inside this function two things happen. First, beginWork is called — a function responsible for the downward part of the traversal: it calls the component function or render method, compares the result with the previous one, creates or updates child fiber nodes, and returns a reference to the next descendant. If there's a descendant, the work loop moves to it and repeats the process. Once beginWork returns null, a leaf node has been reached — there's nowhere further to go.
At this point, completeWork is called — the upward part of the traversal. For nodes that correspond to DOM elements, this is where the real DOM node is created or updated — but not added to the document, only prepared in memory. Nodes that require some changes (insertion, update, deletion, effect calls) are marked with flags. After completeWork finishes, the node moves up to the parent via the return pointer, or the work loop moves to the sibling node via sibling. Thus, traversal follows the principle of "depth-first, then right, then up."
Scheduler and the Lanes Priority System
Not all updates are equally important, and React understands this. The priority system in modern versions of React is implemented through the Lanes mechanism — a bitmask representing both priority and a group of updates simultaneously. The smaller the numerical value of the lane, the higher the priority: a user click has a value of 0b0000000000000000000000000001000, while background transitions have 0b0000000001111111111111100000000. When React decides what to start working on, it calls getNextLanes, which returns the set of lanes with the highest priority.
The work scheduler accepts a callback and a priority level, and runs the task at an appropriate moment. When React begins work on the tree, it checks a special flag from the scheduler inside the work loop — and if the scheduler signals that time is up and the browser thread needs to be yielded, the loop is interrupted. Work is saved in the workInProgress tree and resumed on the next call. This is exactly how render interruptibility is achieved. However, if an update falls into a BlockingLane (for example, a synchronous call from an event handler), React executes the work to completion without interruption.
Commit Phase: Three Tree Passes
When the render phase is complete and the workInProgress tree is fully built, the commit phase begins — it is always synchronous and cannot be interrupted. Interruption is not acceptable here: if half the changes are applied and then stopped, the user would see an inconsistent interface. The commit phase in React's source code consists of three sequential passes through the tree, each responsible for its own class of work.
The first pass calls, for example, getSnapshotBeforeUpdate on class components and performs some other operations.
The second pass is the actual DOM mutation: insertion, attribute updates, node deletion, ref updates. At the end of this pass, pointer switching happens: root.current switches from the former current tree to workInProgress, which from this moment becomes the new current.
The third pass launches useLayoutEffect and its class component equivalents. All of this executes within a single synchronous JavaScript task, which is exactly why useLayoutEffect already uses the new DOM values but the browser hasn't actually rendered them yet.
After this, already asynchronously via the browser's MessageChannel API, passive effects from useEffect are launched. This separation is intentional: useLayoutEffect executes synchronously before the browser has rendered the changes, so it's suitable for DOM measurements, while useEffect is for operations that can wait.
How to Apply This Knowledge in Practice
Understanding how Fiber is structured internally helps make more informed decisions. When a component renders, React calls its function, gets React elements, then the reconciler compares them with the corresponding fiber nodes and decides whether real work is needed. An extra render of a component function is cheap; an extra DOM mutation is expensive. So optimizations like React.memo make sense when a component renders frequently but its props change rarely — in this case React applies the optimization and doesn't spend time on beginWork for the entire subtree. For heavy updates that don't require an immediate response, useTransition allows explicitly placing work in TransitionLanes — and then React can interrupt this render if a more urgent update appears, like user input. Fiber gives React complete control over when and in what order to do work — and this is exactly what underlies the entire modern React architecture.
Part 6. Alternative Rendering Paths.
Throughout this research we've talked about one rendering scenario — the browser receives HTML/CSS/JS and builds the DOM. However, pixels appearing on screen are not limited to just this. In this final part we'll look at alternative paths and technologies, and give an overview of everything that may be available when we talk about rendering some content.
SSR: Server-Side Rendering
Server-Side Rendering is a method of creating web pages where ready-made HTML code is generated on the server, not in the user's browser. Even before the SPA (single page application) era, it was the server that generated HTML and sent it to the browser. Today SSR is popular again, but in a new form, thanks to frameworks like Next.js and Nuxt.
How it works:
- The browser makes a request to the server.
- The server runs JavaScript (Node.js, Deno, Bun), executes components, and generates an HTML string.
- The finished markup is sent to the client, and the browser can immediately render the page.
- In parallel or after, the JS bundle loads and hydration occurs — React/Vue "bring to life" the already-existing DOM by attaching event handlers.
What SSR provides:
- Time to first content paint (FCP/LCP) is reduced, since the user sees content before JS loads, parses, and executes.
- Search bots receive ready-made HTML without needing to execute JavaScript, improving the application's SEO indexing.
- The page is accessible and works even with scripts disabled.
Hydration is an expensive process. The browser receives HTML from the server, but then still has to "reconcile" it with React's virtual DOM. If server and client output diverge, React rebuilds the DOM from scratch. That's why some time ago Islands Architecture started gaining popularity. React Server Components can be considered an implementation of this approach — a mechanism where only interactive "islands," the so-called "client components," are hydrated, while "server components" remain static HTML.
Canvas: 2D Graphics
<canvas> is a rectangle with programmable raster content. Unlike the DOM, canvas has no object tree: we draw directly through the Canvas API.
const canvas = document.querySelector('canvas');
const ctx = canvas.getContext('2d');

ctx.fillStyle = '#ff6b6b';
ctx.fillRect(10, 10, 100, 50); // rectangle

ctx.font = '24px serif';
ctx.fillText('Hello, Canvas!', 10, 100); // text
Commands like fillRect are instructions to draw something on the canvas right now. After execution they leave no connected object in memory. You can't "select" a drawn rectangle and move it. To "move" an object, you need to clear the canvas and draw everything again.
Calling canvas.getContext('2d') returns a CanvasRenderingContext2D object — in Chromium's case, a wrapper around Skia. When we call ctx.fillRect(...), the JavaScript call is translated into a Skia command.
The pixel buffer is a block of memory that the browser allocates for the canvas. Its size is computed as width × height × 4 bytes (RGBA: red, green, blue, transparency). For example, for an 800×600 canvas this is ~1.9 MB. Skia writes the result of drawing directly into this buffer.
Then this buffer needs to get to the screen, and here canvas also integrates into the browser pipeline we covered in previous parts. The canvas element becomes a separate composited layer and is passed to the compositor. The compositor, in turn, composites it with the rest of the page.
The main problem with canvas is that it lives on the browser's main thread. A complex drawing loop (a game or editor) competes for processor time with user input handling, JS execution, and other operations.
OffscreenCanvas helps solve this problem: thanks to it, the canvas can be passed to a Web Worker, and all rendering happens in a separate thread.
// Main thread
const offscreen = canvas.transferControlToOffscreen();
worker.postMessage({ canvas: offscreen }, [offscreen]);

// Web Worker
self.onmessage = ({ data }) => {
  const ctx = data.canvas.getContext('2d');
  // Draw here, without interfering with the main thread
};
Canvas is used wherever the DOM becomes a bottleneck: 2D games, image editors, charts.
SVG: Vector Rendering
SVG (Scalable Vector Graphics) is an XML format for vector graphics, fully integrated into the DOM. Unlike canvas where you work with pixels directly, SVG describes intentions: "draw a circle of radius 50 at point (100, 100)." The browser decides exactly how to turn this into pixels — and does it fresh each time it needs to. That's why SVG looks equally sharp on a laptop screen, a 4K monitor, and printed on paper.
Each SVG element — <path>, <circle>, <rect>, <text> — is a full-fledged DOM node. The browser builds a tree for SVG just like for HTML, applies CSS styles to it (including animations and transitions), tracks mouse and keyboard events. This gives enormous flexibility: you can write document.querySelector('circle').setAttribute('r', 80) and the circle will immediately change size. You can attach addEventListener('click', ...) to an individual <path>. Screen readers can read <title> and <desc> inside SVG.
When the browser encounters SVG, the rendering process goes through the same stages as for regular HTML that we covered in previous parts — just with its own specifics at each step.
SVG markup is parsed into SVGElement nodes. Each element carries geometric attributes (cx, cy, r, d) and style attributes (fill, stroke, opacity). The d attribute of a <path>, for example M 10 10 L 100 50 C 150 80 200 20 250 50 Z, is a sequence of commands: "move," "draw a line," "draw a Bezier curve," "close the path."
Unlike HTML layout where the browser computes the flow layout of elements, SVG uses a user coordinate system. The viewBox="0 0 200 200" attribute defines the internal coordinate system, and the actual element size on the page is determined by width/height attributes or CSS. The browser computes a transformation matrix that translates from one system to another and applies it to the entire scene.
If an SVG element is animated via CSS transform or opacity, the browser can move it to a separate composited layer — exactly the same as for regular HTML elements. In this case re-rasterization isn't needed: the compositor simply applies the transformation to the already-finished texture. But if d (path shape) or fill (fill color) is animated — that's geometry changing, and the browser will rasterize it from scratch on every frame.
SVG is good for icons, illustrations, interactive charts. But with thousands of elements the DOM tree becomes a bottleneck — then you switch to canvas or WebGL.
WebGL and WebGPU: GPU in the Browser
Canvas and SVG aren't suitable when you need a real 3D scene with thousands of objects, dynamic lighting, and 60 FPS. This is where WebGL comes in — a browser interface for directly programming the graphics card.
The idea is simple: the CPU (processor) is good at sequential complex computations, while the GPU (graphics card) excels at parallel simple ones. A modern GPU has thousands of small cores that can simultaneously process thousands of pixels or vertices. WebGL is the bridge between JavaScript and the GPU.
A shader is a program that executes not on the CPU but directly on the GPU. You write it in a special language called GLSL (Graphics Library Shader Language), which is syntactically similar to C. Shaders come in two types and work as a pair.
- A vertex shader runs once for each vertex of the geometry. Its job is to tell the GPU exactly where on screen this vertex should land. Any 3D object consists of triangles, and each triangle consists of three vertices with coordinates in three-dimensional space. The vertex shader takes a 3D coordinate and turns it into a 2D screen coordinate taking into account camera position, perspective, and object transformations.
- A fragment shader runs once for each pixel covered by a triangle. Its job is to tell the GPU what color that pixel should be. This is where lighting, shadows, texturing, and reflections are implemented.
We won't go into detail about how to work with WebGL. We'll just note that WebGL uses canvas.
<canvas id="gl-canvas" width="640" height="480"></canvas>
const canvas = document.querySelector("#gl-canvas");
const gl = canvas.getContext("webgl");
A WebGL canvas is the same composited layer. The compositor reads the rendering result of this layer as a regular texture during the final page assembly.
Writing raw WebGL is verbose and difficult: dozens of lines for every operation. That's why high-level libraries like Three.js exist.
WebGPU is WebGL's successor, designed from scratch for modern GPU APIs. It's partially available in most browsers. Most notably through this tool, the GPU can now be used not only for graphics but also for general-purpose computations (GPGPU) — machine learning, data processing, etc.
PDF: Rendering for Print
When you open a PDF in a browser, it doesn't just "display a picture." The browser needs to execute an entire programming language.
PDF (Portable Document Format) grew out of PostScript — a page description language developed by Adobe in the 1980s for controlling printers. PostScript was a fully-fledged programming language: the printer literally executed code that told it how to draw the page. PDF is a simplified but similar system.
When you open a PDF in Chrome, the PDFium library written in C++ does the work. It directly accesses system fonts, uses Skia for rasterization, and the compositor receives the result as a regular texture.
PDF.js is a fundamentally different approach: Mozilla implemented a full PDF renderer in pure JavaScript. This means all parsing, operator interpretation, font management, and rasterization happen in the browser's JavaScript engine, and the result is drawn through the Canvas API.
The browser can convert from HTML to PDF via window.print() and the print dialog. Something notable happens internally: the browser runs a separate rendering pass with different rules (CSS @media print, page breaking). Chromium passes the result to PDFium, which then renders the content.
Video Rendering
The <video> element, from the compositor's perspective, is a separate layer. The compositor doesn't wait for the browser to repaint the DOM — it receives fresh video frames directly from the decoder and composites them into the final image independently of the rest of the page. This means video continues playing smoothly even if the browser's main thread is busy with heavy JavaScript.
Video and audio synchronization is a separate task. The browser maintains a presentation timestamp for each frame: the moment in time when it should be displayed. Audio goes through a separate AudioContext with its own buffers and timing. If the decoder falls behind (for example, on a complex scene with fast motion), the browser may intentionally drop a frame to avoid desynchronizing from the audio — we see this as a sudden jump instead of smooth motion.
For a long time JavaScript couldn't encode or decode video directly in the browser. The WebCodecs API added this capability: now VideoDecoder and VideoEncoder are available — direct wrappers around hardware codecs, without intermediate layers. Thanks to this, it's now possible to build full-featured video editors right in the browser.
Conclusion
We started with browser engines and traced the path from source code to pixels on screen: through DOM building, styles, layout, paint, layers, compositor, and GPU. We saw how React optimized its work through Fiber. And finally, we confirmed that "rendering" is a concept far broader than a single pipeline.
The browser is an amazing piece of engineering. I hope this research helped make it a little less mysterious.